發表文章

目前顯示的是有「embedded Linux」標籤的文章

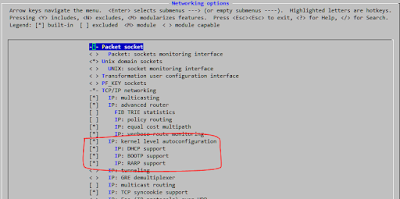
configure Root Filesystem over NFS on Menuconfig
圖片
The CONFIG_ROOT_NFS configuration option, which depends on CONFIG_IP_PNP. To enable root filesystem over NFS you must enable the "IP: kernel level autoconfiguration" option in the "Networking options" menu first.

利用 NFS 當 rootfile system

將uboot bootargs 設成下面組合就可以 bootargs rootdelay=5 root=/dev/nfs rw nfsroot=$(serverip):$(rootpath),nolock,vers=4,tcp ip=dhcp nfsrootdebug bootargs rootdelay=5 root=/dev/nfs rw nfsroot=$(serverip):$(rootpath) ip=dhcp nfsrootdebug bootargs rootdelay=5 root=/dev/nfs nfsroot=$(serverip):$(rootpath),nolock,vers=4,tcp rw ip=$(ipaddr):$(serverip):0.0.0.0:255.255.255.0::eth0:off nfsrootdebug # nfsrootdebug --> 連線不成功, 可以debug # vers=4,tcp --> 連線不成功, 確認一下 server 的版本。nfsstat –s <<- Print server-side statistics                             新版 ubuntu 應該都是 v3/v4 了.

How to create a defconfig file from a .config?

How to create a defconfig file from a .config? # make savedefconfig # cp defconfig arch/arm/configs/my_cool_defconfig

how to decompile dtb file (Device Tree)

./scripts/dtc/dtc -I dtb -O dts -o devicetree.dts devicetree.dtb $ sudo apt-get install device-tree-compiler $ dtc -I dtb -O dts juno.dtb > juno.dts $ dtc -I dts -O dtb juno.dts > juno.dtb   reference: https://forum.digilentinc.com/topic/2427-how-to-decompile-dtb-file/ Device Tree, reference: Device Tree(一):背景介绍  http://www.wowotech.net/device_model/why-dt.html Device Tree(二):基本概念  http://www.wowotech.net/device_model/dt_basic_concept.html Device Tree(三):代码分析  http://www.wowotech.net/device_model/dt-code-analysis.html Device Tree(四):文件结构解析 http://www.wowotech.net/device_model/dt-code-file-struct-parse.html x

trace32 Hisilicon Hi3516c cmm sample

利用 trace32 將 uboot 載到 ram 上,執行。 下面是注意事項: 1.   建議在 flash 是空的狀況下,使用。 2.   如果有 code ,請不要 run linux image ,會無法使用。 3.   其他連不到的情況,請自行排除。 https://drive.google.com/file/d/0B9XTtNLiONrfQUZFdXZkX0hqZlU/view?usp=sharing SYS.RESET system.cpu ARM926EJ sys.option noircheck on sys.option MULTIPLESFIX on ;system.JTAGCLOCK 5MHz system.JTAGCLOCK 1MHz system.up winclear winpos 0% 0% 50% 50% Data.List area.res area.c select 999 area.s select winpos 50% 50% 50% 50% w.area select print "Start init System Reg:" print "config PLL timeout. 4096*24M=171us" ; config PLL timeout. 4096*24M=171us d.s 0x2011001c %LONG 0x80000600 ; ; config APLL d.s 0x20030000 %LONG 0x11000000 ; d.s 0x20030004 %LONG 0x0068306E ; ; config VPLL d.s 0x20030008 %LONG 0x12000000 ; d.s 0x2003000c %LONG 0x007C2063 ; ; config BPLL ;d.s 0x20030010 %LONG 0x19000000 ; ;d.s 0x20030014 %LONG 0x00682064 ; d.s 0x20030010 %LONG 0x11000000 ; ...

Transferring files using serial console

Transferring files using serial console 沒有網路時,利用 RS232 傳檔: 1. lrzsz --> 利用 putty 直接拉了檔案往該視窗裡丟,就能上傳檔案了             要拉檔案出來也很方便哦,下這樣的指令後, sz 檔名, 它就會問你要檔案要存在哪兒 2. 利用 busybox rx --> 還沒試過 3. 使用檔案傳輸方式,但只能傳 ASCII 檔案。     target$ cat >file            >> 傳完用 CTRL+D 結束        host$ minicom                如果是用 XShell 或其他,可以用傳檔方式         CTRL+A S         +-[Upload]--+         | zmodem    |         | ymodem    |         | xmodem    |         | kermit    |         |>ascii<    |        ...

FLASH FILE SYSTEMS FOR MTD DEVICES: JFFS2, YAFFS2, UBIFS AND LOGFS.

http://www.lindusembedded.com/blog/2010/05/20/flash-file-systems-for-mtd-devices-jffs2-yaffs2-ubifs-and-logfs/

編譯 binary 的時候自動加入 release version 與 date

Makefile   1 2 3 4 SVN_VERSION = "\"`svn info | grep Revision | sed 's/Revision: //g'`\"" BUILD_TIME = "\"`date '+%Y/%m/%d %H:%M:%S'`\""   CFLAGS += -DSVN_VERSION=$(SVN_VERSION) -DBUILD_TIME=$(BUILD_TIME) .c 檔   1 2 3 4 void show_version (void) {      printf ( "SVN Version: %s, Bulid time: %s\n" , SVN_VERSION, BUILD_TIME); } Preprocessing 的時候 macro 會自動被帶換掉啦!     reference: http://blog.yslin.tw/2012/03/binary-release-version-date.html

uboot Command Scripts 教學

http://www.stlinux.com/u-boot/using http://www.denx.de/wiki/DULG/CommandLineParsing

修改 partition 的 UUID

check partition's uuid:     。 $ ls -l /dev/disk/by-uuid     。 # blkid /dev/sdx modified uuid:     。 uuidgen | xargs tune2fs /dev/sda5 -U (debian預設沒這指令)     。 $ tune2fs -U UUID /dev/sdx (UUID是已知的)     。 $ tune2fs -U time /dev/sdx (產生隨機的uuid)

Linux Kernel Module Programming Guide

http://www.wangcong.org/articles/lkmpg_cn/index.htm

如何編譯特定的 Linux Module

這也不是一天兩天了,常常會對 Linux 的某些 Driver 做些 Patches,或對某些 Module 做修改,但每次要 compile 出那幾個 ko 檔時就很頭痛,既然只是修改特定的 module ,又不用重新做出新的 kernel image,為何每次都要將整個 kernel 重新 compile 呢?其實有方法可以只編譯特定的 kernel module 以並免不必要的時間浪費。 切換到目標 module 的目錄下,然後執行: make script make prepare make -C /usr/src/linux SUBDIRS=$PWD modules ※粗體字部份改成 kernel source 的位置即可。 Reference:http://fred-zone.blogspot.tw/2008/09/linux-module.html

strip 用法

Shared Library(*.so) strip --strip-debug --remove-section=.note --remove-section=.comment *.so kernel module(*.ko) strip -g -S -d *.ko or strip --strip-debug --strip-unneeded *.ko find ./ install/lib/modules/3.10.17/kernel/ -iname "*.ko" -exec strip -g -S -d {} \;

patch aufs for linux-3.10.17

git clone git://aufs.git.sourceforge.net/gitroot/aufs/aufs3-standalone.git aufs3-standalone.git cd aufs3-standalone.git git checkout origin/aufs3.10 --> 3.x 依據你的 kernel 版本 參考 README ... - apply ./aufs3-kbuild.patch to your kernel source files. - apply ./aufs3-base.patch too. - apply ./aufs3-mmap.patch too. - apply ./aufs3-standalone.patch too, if you have a plan to set   CONFIG_AUFS_FS=m. otherwise you don't need ./aufs3-standalone.patch. - copy ./{Documentation,fs,include/uapi/linux/aufs_type.h} files to your kernel source tree.   Never copy $PWD/include/uapi/linux/Kbuild.  cp -rfv ../aufs3-standalone.git/{Documentation,fs} ./  cp -rfv ../aufs3-standalone.git/include/uapi/linux/aufs_type.h ./include/uapi/linux/  patch -Np1 -i ../aufs3-standalone.git/aufs3-kbuild.patch  patch -Np1 -i ../aufs3-standalone.git/aufs3-base.patch  patch -Np1 -i ../aufs3-standalone.git/aufs3-mmap.patch  patch -Np1 -i ../aufs3-standalone.git/aufs3-standalone.patch 進入 m...

Reversing mkimage

dd if="image   file " of="recovered file" bs=64 skip=1

uboot fw_printenv & fw_setenv 用法

1. 在 uboot 下 make env --> 會在 tool/env 裡得到 fw_printenv. 2. fw_setenv 和 fw_printenv 是同一個執行檔, 用 copy 或 link 都可. fw_env.config 是 決定你的 uboot 的 設定, 必須放在 /etc 下. 範例如下: 因為我用 REDUNDAND 所以要建兩個 mtd, 如下, 下面兩個範例, 不同在於 reundand env 有沒有在不同的 mtd. ================================================================================================== # MTD device name       Device offset   Env. size       Flash sector size       Number of sectors /dev/mtd1               0x0000          0x2000          0x20000 1 /dev/mtd2               0x0000          0x2000          0x20000 1 /etc # cat /proc/mtd  dev:    size   erasesize  name mtd0: 00080000 00020000 "U-Boot" mtd1: 00040000 00020000 "U-Boot Env" mtd2: 00040000 00020000 "Backup U-Boot Env" =====...