發表文章

目前顯示的是有「Linux」標籤的文章

Linux UVC 兩個 video node, 哪一個可使用 ?
圖片
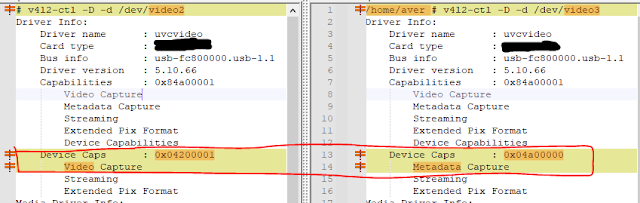
 UVC 裝置會有個video node, 哪一個可用? 用 v4l2-ctl 可以看出 device caps 不同 struct v4l2_capability cam_cap; ioctl(fd, VIDIOC_QUERYCAP, &cam_cap); videodev2.h /* Values for 'capabilities' field */ #define V4L2_CAP_VIDEO_CAPTURE 0x00000001  /* Is a video capture device */ #define V4L2_CAP_META_CAPTURE 0x00800000  /* Is a metadata capture device */ PS:  VIDIOC_QUERYCAP 要確認的是 device_caps 而不是 capabilities   reference:  https://askubuntu.com/questions/1294041/why-only-one-usb-camera-shows-two-video4linux-devices https://bugzilla.kernel.org/show_bug.cgi?id=199575

同步 github/gitlab fork 出來的 repository

圖片
1.   沒有現成的可以一鍵同步的方法。 2.   最方便的是用 GitHub Desktop ,請看下面圖示 點選 merge 在 fetch 3.   另一種就是用 command line. # git remote -v # git remote add upstream git@GIT.AVER.COM:EDU/FW/m10v/linux.git # git fetch upstream # git checkout S510-2 # git merge upstream/S510-2 # git push origin S510-2 --tags   若 upstream 上有新的 branch # git checkout upstream/S510-3 # git checkout -b  S510-3 # git push origin S510-3 --tags PS: 加上 --tags 才會將 tag 也一併同步   Reference: https://docs.github.com/en/free-pro-team@latest/github/collaborating-with-issues-and-pull-requests/syncing-a-fork https://www.peterdavehello.org/2014/02/update_forked_repository/ https://gitbook.tw/chapters/github/syncing-a-fork.html  

How to Install Xrdp Server (Remote Desktop) on Ubuntu 20.04

reference: https://linuxize.com/post/how-to-install-xrdp-on-ubuntu-20-04/ 我的 ubuntu 是 desktop 版本,所以不用安裝桌面套件 sudo apt install xrdp sudo adduser xrdp ssl-cert sudo systemctl restart xrdp sudo systemctl status xrdp 這樣就可以用 windows 遠端桌面開啟

configure Root Filesystem over NFS on Menuconfig

圖片
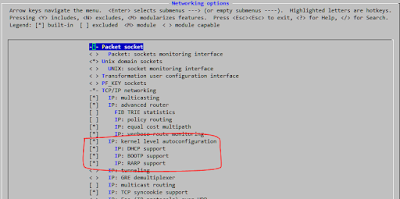
The CONFIG_ROOT_NFS configuration option, which depends on CONFIG_IP_PNP. To enable root filesystem over NFS you must enable the "IP: kernel level autoconfiguration" option in the "Networking options" menu first.

BusyBox set uart

stty -F /dev/ttyS1 stty -F /dev/ttyS1 raw -echo -echoe -echok stty -F /dev/ttyS1 115200 stty -F /dev/ttyS1 speed stty -F /dev/ttyS2 stty -F /dev/ttyS2 raw -echo -echoe -echok stty -F /dev/ttyS2 115200 stty -F /dev/ttyS2 speed Statistics # cat /proc/tty/driver/<driver_name> reference: http://www.armadeus.org/wiki/index.php?title=Serial_ports_usage_on_Linux

How to create a defconfig file from a .config?

How to create a defconfig file from a .config? # make savedefconfig # cp defconfig arch/arm/configs/my_cool_defconfig

Ubuntu 如何使用 root 登入

# sudo -i # sudo su - 這樣就可以取得 root 的權限做事了

how to decompile dtb file (Device Tree)

./scripts/dtc/dtc -I dtb -O dts -o devicetree.dts devicetree.dtb $ sudo apt-get install device-tree-compiler $ dtc -I dtb -O dts juno.dtb > juno.dts $ dtc -I dts -O dtb juno.dts > juno.dtb   reference: https://forum.digilentinc.com/topic/2427-how-to-decompile-dtb-file/ Device Tree, reference: Device Tree(一):背景介绍  http://www.wowotech.net/device_model/why-dt.html Device Tree(二):基本概念  http://www.wowotech.net/device_model/dt_basic_concept.html Device Tree(三):代码分析  http://www.wowotech.net/device_model/dt-code-analysis.html Device Tree(四):文件结构解析 http://www.wowotech.net/device_model/dt-code-file-struct-parse.html x

Copy with a progress bar with cpv

reference:  https://ownyourbits.com/2017/09/13/copy-with-a-progress-bar-with-cpv/

"echo 0 > /proc/sys/kernel/hung_task_timeout_secs"

Better Linux Disk Caching & Performance with vm.dirty_ratio & vm.dirty_background_ratio reference :          https://feichashao.com/dirty_ratio_and_dirty_background_ratio/         https://lonesysadmin.net/2013/12/22/better-linux-disk-caching-performance-vm-dirty_ratio/

Makefile的賦值運算符(=, :=, +=, ?=)

Makefile的賦值運算符(=, :=, +=, ?=) 總結: = 是最基本的賦值 := 會覆蓋變數之前的值 ?= 變數為空時才給值,不然則維持之前的值 += 將值附加到變數的後面 另外 =, :=這兩賦值運算符號在網路上查詢,常常會看到這種說法: = 在執行時擴展(values within it are recursively expanded when the variable is used, not when it's declared) := 在定義時擴展(values within it are expanded at declaration time) 而白話一點的說法如下範例所示   1. =   make會將整個makefile展開後,才決定變數的值。也就是说,變數的值會是整個Makefile中最後被指定的值。看例子: x = hello y = $(x) world! x = hi all: @echo $(y)   在上例中,輸出結果將會是 hi world! ,而不是 hello world!   2. :=   變數的值在Makefile展開途中就會被給定,而不是整個Makefile展開後的最终值。 x := hello y := $(x) world! x := hi all: @echo $(y)   輸出結果 ====> hello world!

monitor tar-progress in linux using pv command

tar cf - /folder-with-big-files -P | pv -s $(du -sb /folder-with-big-files | awk '{print $1}') | gzip > big-files.tar.gz 4.69GB 0:04:50 [16.3MB/s] [==========================> ] 78% ETA 0:01:21 $ pv big-files.tar.gz | tar xjf - -C target_directory reference:         http://www.tecmint.com/monitor-copy-backup-tar-progress-in-linux-using-pv-command/

distcc

distcc is a tool for speeding up compilation of source code by using distributed computing over a computer network. 此工具就是可以把編譯進行分散式的處理,相當方便快速。 利用 3 台 pc 實現 distcc ... 1. 先安裝好 apt-get install distcc 2. 在每台 pc 時,開啟 distcc daemon server     # distccd --daemon --allow 127.0.0.1 --allow 10.100.90.0/24 3.   time make -j10 CC="distcc arm-arago-linux-gnueabi-gcc" CROSS_COMPILE=arm-arago-linux-gnueabi- ARCH=arm uImage real 1m48.143s user 5m55.716s sys 0m12.236s  export DISTCC_HOSTS="localhost 10.100.90.232 10.100.90.240"  time make -j10 CC="distcc arm-arago-linux-gnueabi-gcc" CROSS_COMPILE=arm-arago-linux-gnueabi- ARCH=arm uImage real 1m4.804s user 2m45.832s sys 0m8.844s  export DISTCC_HOSTS="--randomize localhost 10.100.90.232 10.100.90.240,cpp,lzo"  time distcc-pump make -j16 CC="distcc arm-arago-linux-gnueabi-gcc" CROSS_COMPILE=arm-arago-linux-gnueabi- ARCH=arm uImage real 0m59.147s user 2...

Busybox ping & nslookup can't work & dns resolv error with bad address.

Busybox ping & nslookup can't work & dns resolv error with bad address. 1. bosybox can't build in static library     --> ping: ../sysdeps/unix/sysv/linux/getpagesize.c:32: __getpagesize: Assertion `_rtld_global_ro._dl_pagesize != 0' failed. 2. use strace : strace -tt -s99 -oLOG ping www.google.com --> libnss_dns.so.2    libnss_files.so.2    libresolv.so.2 缺少上面檔案. 補上就可以了.

解決 Samba4 遠端無法開啟 symbolic link 資料夾的問題 ......

在  [global] 加入下面設定 follow symlinks = yes unix extensions = no wide links = yes

Socket example

圖片
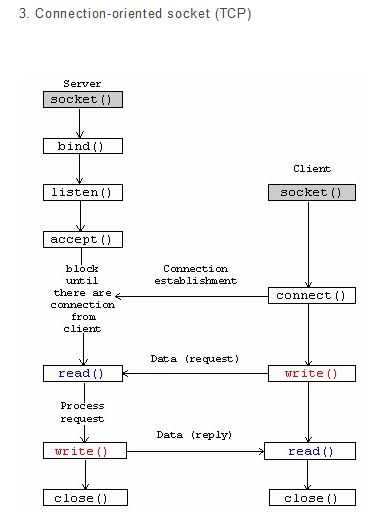
reference: http://kezeodsnx.pixnet.net/blog/post/27462696-socket-programming-%E7%AD%86%E8%A8%98 http://www.cs.dartmouth.edu/~campbell/cs50/socketprogramming.html

Disable Network Manager

Disable Network Manager Debian: $ sudo /etc/init.d/network-manager stop $ sudo update-rc.d network-manager remove Ubuntu or Linux Mint $ sudo stop network-manager $ echo "manual" | sudo tee /etc/init/network-manager.override Fedora: $ sudo systemctl stop NetworkManager.service $ sudo systemctl disable NetworkManager.service $ sudo vi /etc/NetworkManager/NetworkManager.conf [ifupdown] managed=false $ sudo vi /etc/network/interfaces # The loopback network interface auto lo iface lo inet loopback # network interface not managed by Network Manager allow-hotplug eth1 iface eth1 inet static address 10.0.0.10 netmask 255.255.255.0 gateway 10.0.0.1 dns-nameservers 8.8.8.8

windows7 samba 與 linux 出現 mount error(12): Cannot allocate memory

修改 HKEY_LOCAL_MACHINE\SYSTEM\CurrentControlSet\Services\lanmanserver\parameters\size 改成 3     1 = 使用的記憶體最小化     2 = 餘額     3 = 輸送量最大化的檔案共用及輸送量最大化的網路應用程式         可用 regedit 修改 或 下面         reg add HKLM\SYSTEM\CurrentControlSet\Services\LanmanServer\Parameters /v Size /t REG_DWORD /d 3 /f     重新開機 or                 sc stop  LanmanServer                 sc start LanmanServer              or                 net start lanmanserve http://support.microsoft.com/kb/232271/zh-tw

Ethernet Off_load

降低網路的 cpu loading 除了開啟 offload engine 還可利用調整 coalescing 1. interrupt coalescing  主要是用來做 latency 跟 cpu overhead 之間的 trade-off。 當 adapter 收到 frame 之後,不會立即的對系统產生中斷,而是等一段時間,收集到更多的 frame 後再一次性的處理, 這會降低 cpu 的負載,但是會產生 latency。 察看 ethtool -c eth0 改變 ethtool -C eth1 rx-usecs 500 ethtool -C eth1 tx-usecs 500 rx-usecs 會同時控制 tx 以及 rx 方向的 coalescing。 值越低的,interrupt coalescence 越不容易發生,latency 越小,相對的,cpu 負載也會越大。 如果增加了 rx-usecs,對於 bulk traffic 會比較好,但是會對 tcp 的性能造成大的損失, 可以通過調大 TSO window divisor(default 為 3) 來彌補: net.ipv4.tcp_tso_win_divisor = 30 2. offload  也就是原先由 CPU 完成事被 NIC offload 了。一般用來做 offload 的包括 segmentation 和 checksum。 察看 ethtool -k eth2

Transferring files using serial console

Transferring files using serial console 沒有網路時,利用 RS232 傳檔: 1. lrzsz --> 利用 putty 直接拉了檔案往該視窗裡丟,就能上傳檔案了             要拉檔案出來也很方便哦,下這樣的指令後, sz 檔名, 它就會問你要檔案要存在哪兒 2. 利用 busybox rx --> 還沒試過 3. 使用檔案傳輸方式,但只能傳 ASCII 檔案。     target$ cat >file            >> 傳完用 CTRL+D 結束        host$ minicom                如果是用 XShell 或其他,可以用傳檔方式         CTRL+A S         +-[Upload]--+         | zmodem    |         | ymodem    |         | xmodem    |         | kermit    |         |>ascii<    |        ...