發表文章

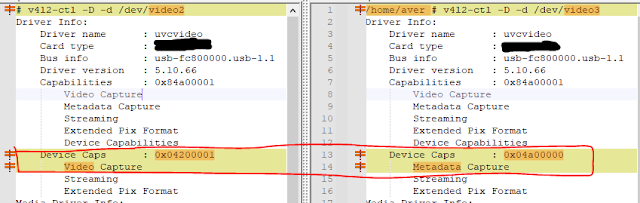
Linux UVC 兩個 video node, 哪一個可使用 ?
圖片
 UVC 裝置會有個video node, 哪一個可用? 用 v4l2-ctl 可以看出 device caps 不同 struct v4l2_capability cam_cap; ioctl(fd, VIDIOC_QUERYCAP, &cam_cap); videodev2.h /* Values for 'capabilities' field */ #define V4L2_CAP_VIDEO_CAPTURE 0x00000001  /* Is a video capture device */ #define V4L2_CAP_META_CAPTURE 0x00800000  /* Is a metadata capture device */ PS:  VIDIOC_QUERYCAP 要確認的是 device_caps 而不是 capabilities   reference:  https://askubuntu.com/questions/1294041/why-only-one-usb-camera-shows-two-video4linux-devices https://bugzilla.kernel.org/show_bug.cgi?id=199575

如何 reset USB host ??

echo 0 > /sys/bus/usb/devices/usb1/authorized echo 1 > /sys/bus/usb/devices/usb1/authorized

同步 github/gitlab fork 出來的 repository

圖片
1.   沒有現成的可以一鍵同步的方法。 2.   最方便的是用 GitHub Desktop ,請看下面圖示 點選 merge 在 fetch 3.   另一種就是用 command line. # git remote -v # git remote add upstream git@GIT.AVER.COM:EDU/FW/m10v/linux.git # git fetch upstream # git checkout S510-2 # git merge upstream/S510-2 # git push origin S510-2 --tags   若 upstream 上有新的 branch # git checkout upstream/S510-3 # git checkout -b  S510-3 # git push origin S510-3 --tags PS: 加上 --tags 才會將 tag 也一併同步   Reference: https://docs.github.com/en/free-pro-team@latest/github/collaborating-with-issues-and-pull-requests/syncing-a-fork https://www.peterdavehello.org/2014/02/update_forked_repository/ https://gitbook.tw/chapters/github/syncing-a-fork.html  

How to Install Xrdp Server (Remote Desktop) on Ubuntu 20.04

reference: https://linuxize.com/post/how-to-install-xrdp-on-ubuntu-20-04/ 我的 ubuntu 是 desktop 版本,所以不用安裝桌面套件 sudo apt install xrdp sudo adduser xrdp ssl-cert sudo systemctl restart xrdp sudo systemctl status xrdp 這樣就可以用 windows 遠端桌面開啟

configure Root Filesystem over NFS on Menuconfig

圖片
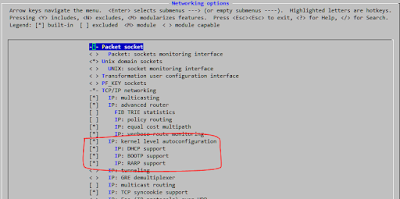
The CONFIG_ROOT_NFS configuration option, which depends on CONFIG_IP_PNP. To enable root filesystem over NFS you must enable the "IP: kernel level autoconfiguration" option in the "Networking options" menu first.

利用 NFS 當 rootfile system

將uboot bootargs 設成下面組合就可以 bootargs rootdelay=5 root=/dev/nfs rw nfsroot=$(serverip):$(rootpath),nolock,vers=4,tcp ip=dhcp nfsrootdebug bootargs rootdelay=5 root=/dev/nfs rw nfsroot=$(serverip):$(rootpath) ip=dhcp nfsrootdebug bootargs rootdelay=5 root=/dev/nfs nfsroot=$(serverip):$(rootpath),nolock,vers=4,tcp rw ip=$(ipaddr):$(serverip):0.0.0.0:255.255.255.0::eth0:off nfsrootdebug # nfsrootdebug --> 連線不成功, 可以debug # vers=4,tcp --> 連線不成功, 確認一下 server 的版本。nfsstat –s <<- Print server-side statistics                             新版 ubuntu 應該都是 v3/v4 了.

BusyBox set uart

stty -F /dev/ttyS1 stty -F /dev/ttyS1 raw -echo -echoe -echok stty -F /dev/ttyS1 115200 stty -F /dev/ttyS1 speed stty -F /dev/ttyS2 stty -F /dev/ttyS2 raw -echo -echoe -echok stty -F /dev/ttyS2 115200 stty -F /dev/ttyS2 speed Statistics # cat /proc/tty/driver/<driver_name> reference: http://www.armadeus.org/wiki/index.php?title=Serial_ports_usage_on_Linux

How to create a defconfig file from a .config?

How to create a defconfig file from a .config? # make savedefconfig # cp defconfig arch/arm/configs/my_cool_defconfig

Ubuntu 如何使用 root 登入

# sudo -i # sudo su - 這樣就可以取得 root 的權限做事了

windows7 command line set display mode

DisplaySwitch.exe /clone  -> will duplicate displays. DisplaySwitch.exe /extend -> will extend displays. Also you can use Win+P if you want a quick shortcut.

how to decompile dtb file (Device Tree)

./scripts/dtc/dtc -I dtb -O dts -o devicetree.dts devicetree.dtb $ sudo apt-get install device-tree-compiler $ dtc -I dtb -O dts juno.dtb > juno.dts $ dtc -I dts -O dtb juno.dts > juno.dtb   reference: https://forum.digilentinc.com/topic/2427-how-to-decompile-dtb-file/ Device Tree, reference: Device Tree(一):背景介绍  http://www.wowotech.net/device_model/why-dt.html Device Tree(二):基本概念  http://www.wowotech.net/device_model/dt_basic_concept.html Device Tree(三):代码分析  http://www.wowotech.net/device_model/dt-code-analysis.html Device Tree(四):文件结构解析 http://www.wowotech.net/device_model/dt-code-file-struct-parse.html x

Copy with a progress bar with cpv

reference:  https://ownyourbits.com/2017/09/13/copy-with-a-progress-bar-with-cpv/

"echo 0 > /proc/sys/kernel/hung_task_timeout_secs"

Better Linux Disk Caching & Performance with vm.dirty_ratio & vm.dirty_background_ratio reference :          https://feichashao.com/dirty_ratio_and_dirty_background_ratio/         https://lonesysadmin.net/2013/12/22/better-linux-disk-caching-performance-vm-dirty_ratio/

git checkout fail " error: The following untracked working tree files would be overwritten by checkout: "

error: The following untracked working tree files would be overwritten by checkout: Remove all untracked files: git clean  -d  -fx . -x means ignored files are also removed as well as files unknown to git. -d means remove untracked directories in addition to untracked files. -f is required to force it to run. reference: https://mirrors.edge.kernel.org/pub/software/scm/git/docs/git-clean.html https://stackoverflow.com/questions/17404316/the-following-untracked-working-tree-files-would-be-overwritten-by-merge-but-i/35067275

Makefile的賦值運算符(=, :=, +=, ?=)

Makefile的賦值運算符(=, :=, +=, ?=) 總結: = 是最基本的賦值 := 會覆蓋變數之前的值 ?= 變數為空時才給值,不然則維持之前的值 += 將值附加到變數的後面 另外 =, :=這兩賦值運算符號在網路上查詢,常常會看到這種說法: = 在執行時擴展(values within it are recursively expanded when the variable is used, not when it's declared) := 在定義時擴展(values within it are expanded at declaration time) 而白話一點的說法如下範例所示   1. =   make會將整個makefile展開後,才決定變數的值。也就是说,變數的值會是整個Makefile中最後被指定的值。看例子: x = hello y = $(x) world! x = hi all: @echo $(y)   在上例中,輸出結果將會是 hi world! ,而不是 hello world!   2. :=   變數的值在Makefile展開途中就會被給定,而不是整個Makefile展開後的最终值。 x := hello y := $(x) world! x := hi all: @echo $(y)   輸出結果 ====> hello world!

Excel 工作表密碼保護的解除方法

當開啟一個 Excel工作表,進入後要看工作表上的公式如何運作,才發現工作表受到密碼保護,上網搜尋了一下破解方法,試過很多種方法都太麻煩,最後終於找到最簡單的破解方法,借此分享,希望用的到的人不必再一一去試。 Excel 工作表密碼保護的解除方法 利用 VBA 巨集程式破解法: 1:打開該文件,切換到“檢視”選項,點擊“巨集”→“錄製巨集”,出現“錄製巨集”窗口,在“巨集名稱”隨意輸入一名稱(假設:ABC),點擊“確定”退出; 2:再點擊“巨集”→“檢視巨集”,選擇“巨集名稱”下的“ABC”並點擊右邊的“編輯”,會自動打開“Microsoft Visual Basic”編輯器,用以下的內容完全替換右側窗口中的所有編碼: Sub  ABC( )    Dim i As Integer, j As Integer, k As Integer    Dim l As Integer, m As Integer, n As Integer    Dim i1 As Integer, i2 As Integer, i3 As Integer    Dim i4 As Integer, i5 As Integer, i6 As Integer    On Error Resume Next    For i = 65 To 66: For j = 65 To 66: For k = 65 To 66       For l = 65 To 66: For m = 65 To 66: For i1 = 65 To 66          For i2 = 65 To 66: For i3 = 65 To 66: For i4 = 65 To 66             For i5 = 65 To 66: For i6 = 65 To 66: For n = 32 To 126             ...

USB 相關

USB 相關     先記錄,再研究 1. USB Host 簡介     http://pollos-blog.blogspot.tw/2015/08/usb-host.html 2. USB Video Class 簡介     http://pollos-blog.blogspot.tw/2014/10/usb-video-class.html 3. USB PTP/MTP 簡介     http://pollos-blog.blogspot.tw/2014/10/usb-ptpmtp.html 4. RS232 over USB 簡介     http://pollos-blog.blogspot.tw/2014/10/rs232-over-usb.html 5. USB Mass Storage Class 簡介     http://pollos-blog.blogspot.tw/2014/10/usb-mass-storage-class.html 6. USB 簡介     USB 簡介[1]    http://pollos-blog.blogspot.tw/2014/07/usb-1.html     USB 簡介[2]    http://pollos-blog.blogspot.tw/2014/07/usb-2.html     USB 簡介[3]    http://pollos-blog.blogspot.tw/2014/07/usb-3.html     USB 簡介[4]    http://pollos-blog.blogspot.tw/2014/07/usb-4.html     USB 簡介[5]    http://pollos-blog.blogspot.tw/2014/07/usb-5.html     USB...

monitor tar-progress in linux using pv command

tar cf - /folder-with-big-files -P | pv -s $(du -sb /folder-with-big-files | awk '{print $1}') | gzip > big-files.tar.gz 4.69GB 0:04:50 [16.3MB/s] [==========================> ] 78% ETA 0:01:21 $ pv big-files.tar.gz | tar xjf - -C target_directory reference:         http://www.tecmint.com/monitor-copy-backup-tar-progress-in-linux-using-pv-command/

distcc

distcc is a tool for speeding up compilation of source code by using distributed computing over a computer network. 此工具就是可以把編譯進行分散式的處理,相當方便快速。 利用 3 台 pc 實現 distcc ... 1. 先安裝好 apt-get install distcc 2. 在每台 pc 時,開啟 distcc daemon server     # distccd --daemon --allow 127.0.0.1 --allow 10.100.90.0/24 3.   time make -j10 CC="distcc arm-arago-linux-gnueabi-gcc" CROSS_COMPILE=arm-arago-linux-gnueabi- ARCH=arm uImage real 1m48.143s user 5m55.716s sys 0m12.236s  export DISTCC_HOSTS="localhost 10.100.90.232 10.100.90.240"  time make -j10 CC="distcc arm-arago-linux-gnueabi-gcc" CROSS_COMPILE=arm-arago-linux-gnueabi- ARCH=arm uImage real 1m4.804s user 2m45.832s sys 0m8.844s  export DISTCC_HOSTS="--randomize localhost 10.100.90.232 10.100.90.240,cpp,lzo"  time distcc-pump make -j16 CC="distcc arm-arago-linux-gnueabi-gcc" CROSS_COMPILE=arm-arago-linux-gnueabi- ARCH=arm uImage real 0m59.147s user 2...

Windows Installer Errors 2738 and 2739

2738, Could not access VBScript run time for custom action. 2739, Could not access JScript run time for custom action. VBScript 1. regedit,刪除機碼 "HKCU\SOFTWARE\Classes\Wow6432Node\CLSID\{B54F3741-5B07-11CF-A4B0-00AA004A55E8}" 2. 用Administrator的身份啟動命令提示字元,然後執行以下指令: 64-bit version of Windows: cd c:\windows\syswow64 regsvr32 vbscript.dll 32-bit version of Windows: cd c:\windows\system32 regsvr32 vbscript.dll JScript 1. regedit,刪除機碼 "HKCU\SOFTWARE\Classes\Wow6432Node\CLSID\{F414C260-6AC0-11CF-B6D1-00AA00BBBB58}" 2. 用Administrator的身份啟動命令提示字元,然後執行以下指令: 64-bit version of Windows: cd c:\windows\syswow64 regsvr32 jscript.dll 32-bit version of Windows: cd c:\windows\system32 regsvr32 jscript.dll referencd: https://tw.answers.yahoo.com/question/index?qid=20100713110248AAGkno2   https://blogs.msdn.microsoft.com/heaths/2007/05/31/windows-installer-errors-2738-and-2739-with-script-custom-actions/   http://boyilee.blogspot.tw...